Sunday, April 2, 2017

Usability Testing

Usability tests have changed my idea on this blog making me feel as if simple is always better. Whether it's creating something on Photoshop, creating a website, or even just writing a paper. There's no need to go around the point for something to look cool if it doesn't make it easy to find what you're looking for.

Specifically for the blog though, I feel simple is the answer. Don't add a ton of images or try to wrap text in a weird way. Don't write essays when you can write paragraphs and keep the reader engaged. And don't try to match color schemes when black and white gets the job done easily.

Usability testing is great to do for a website that has been up and running, but I believe for a new blog or website, try everything because something that doesn't work for someone else could work for you and vice versa. See how everything looks and then go from there to change what isn't working. And down the road when you feel nothing can be improved, do a usability test and prove yourself wrong.

Different types of usability tests:
According to tothenew.com
1. Click Test - Measures where users are clicking the most


2. Moderated/One to One Test - Moderator sits with you while you complete a live tasks


3. Heat Map Test - Indicates which information is seen the most


4. Scroll Test - Maps page scrolling


5. Preference or A/B Test - Intended to know the user's preference


6. Navigation Test - A multi-step process for users to navigate and complete certain tasks


Monday, March 20, 2017

Putting an Image Into Text

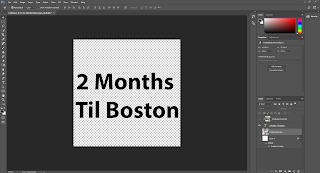
Today was another successful attempt with Photoshop. We see so many graphics that include text with an image. It is actually a lot easier than I thought it would be and played around a little extra with different types of images and effects with it. So to start, as you can see below I added text for an upcoming date that we wanted in the graphic. Since it's almost 2 months until the Boston Shootout for Soldiers event, it seemed like the perfect graphic to make.
So after adding the text and then the image, all you have to do is right click on the layer in the bottom right for your image and click "create clipping mask" and it seamlessly puts the image into the text you already placed on the picture. 

Then I just added a background image and a background gradient to fill the rest of the picture up and to me it looks great! There may be a lot going on but making the graphic was more for practice than use. The final product is below!


Monday, March 13, 2017

Layering Images

My knowledge with Photoshop is continuing to expand! Today I figured out how to layer an image by creating a duplicate layer of the part of the image I wanted to be in front of my other image. This is especially useful because it helps when creating graphics to layer images and cut images out. So to start the project, I had an initial idea of putting a large Shootout for Soldiers logo behind an image to see how it looked. The initial image I cut out looked like this..


Next, I took that image and used the quick selection tool to select everyone on the bottom half of the picture and the flag sticking up to be able to place the logo behind it. As I am still learning, the quick selection tool is not one of my strong suits. So I had to use the quick selection tool to delete as much as I could and then used the eraser tool to delete the excess background I didn't want. But then the image didn't work the way I wanted it and I couldn't cut as much as I wanted so I changed gears and used a different, simpler image.


So the image I used had one person playing a drum with a very cool background behind it. When I saw it, the picture seemed like the perfect starting picture for me. Here it is below...


This picture was great because it was simple, and I wanted to find the perfect spot to place my PNG logo behind. I started behind the arm and the drum stick but again, it didn't look clean as the quick selection tool wasn't really working for me. So I decided to cut out the head and torso of the man in the image to place the logo behind him. And I think it turned out incredible. Two months into learning Photoshop, I may not be an expert, or great for that matter, but I have definitely improved.


Wednesday, February 22, 2017

The New Features of Photoshop


Podcast


Linkhttps://helpx.adobe.com/photoshop/using/whats-new.html


Transcript: Hey everyone, welcome to suiteskills.blogspot.com, where we learn Photoshop together. Since we’re doing a podcast today, we’re actually not going to work in project form, but research. Let’s look at all of the new features that have been added to Photoshop 2017. First off, on new Mac’s you can now use the touch bar with Photoshop. The three available modes right now are layer properties, brushes, and favorites. And several context specific operations ca be completed too. Next, you can actually start your projects with available backgrounds, instead of from scratch. Next is my personal favorite, there is a comprehensive search bar allowing you to search for something you’re looking for. Whether it’s a layer, tool, or color you can now search for it. You can get there by clicking edit and then search or hitting Command/Control + F. There’s also a magnifying glass on the screen that you can click to begin typing. They have added some new fonts as well. Most notably EmojiOne font where you can use emoji’s in your images and work. They have also added OpenType SVG with the Trajan Color Concept. Next, the Polygonal Lasso is now available in the workspace. For more details click the link below in the transcript to be able to read about these new features! And who knows, maybe you’re new like me and didn’t even realize some of these features were recently added. 

Wednesday, February 15, 2017

Cutting Someone Out of Photoshop

I can honestly say, I know an important part of Photoshop! I successfully cut someone out of a JPEG image, saved them as a PNG image, and pasted it into a different image. This is one of the key features in Photoshop as it allows you to create brand new images and designs by combining different pictures. But to do this, I had to find a tutorial and blog.spoongraphics had the perfect tutorial for me. It showed me different ways to cut parts of a picture out and explained what each tool did. So of course I had to find a starting image that was fun enough to use but simple enough to cut. That's where I found this awesome image from Shootout for Soldiers Baltimore!


This was a great picture to use because it only had one person to focus on and no one else in focus. And it's hilarious! Look at it! A guy is wearing lacrosse pads with a sombrero on his helmet! And to start I used the eraser tool to see what it did and it did just as I expected, erased. But it didn't erase very much so I experimented with other tools. That's when I found the background eraser tool. But I couldn't figure that one out so I moved on to the magic eraser tool. By the way, if you're looking for what these tools do, check out my previous post here. The magic eraser tool did a lot but wasn't very specific. So I explored more with the eraser tool and noticed you could change how large the eraser was by clicking in the top left corner. And after about 10 minutes of playing around, I felt I had done a good enough job erasing to move on to the next step.


And the next step was finding an image to use and where to put it. So I thought it would be fun to put him on the Shootout for Soldiers logo and see where he fits. Simple enough, I found a photo that was a JPEG and dragged it into Photoshop. And the finished product is my favorite yet! I think it looks great and it shows I'm really learning Photoshop! And who knows, maybe I'll start to learn more difficult tasks soon!


Wednesday, February 8, 2017

The Benefits... And Costs of Photoshop


Transcript: Photoshop is one of the most useful tools in the Adobe Creative Suite package. For the digital editor, you can alter images, add text, and even delete parts of a picture. People use Photoshop in almost every profession/company for social media purposes and graphic or logo creation. Since Photoshop is so difficult for the user to master, having proficient Photoshop skills is a game changer in the professional world. With tools like the magic wand, lasso, and clone stamp, rarely can someone just sit down and be proficient with Photoshop. It takes time to master, so the only way to improve is practice, practice, practice. Unfortunately, Adobe Creative Suite is expensive, costing the regular user $50 a month to purchase. As a student, you can get Adobe Photography which includes Photoshop and Lightroom it will only cost you about $10 a month. Or you can purchase the entire Creative suite for $20 a month. So, when these companies and organizations want you to have some Photoshop knowledge, it might cost you a pretty penny to practice. But if you’re a student, find out if your school has a computer lab that already has Photoshop on it so you can practice.